This will give a cursory look at what can be done to one of the images on the Kathyanne Art site. It's a before and after. I got involved in changing this image to something else and didn't write the steps down, so in this situation, it will be food for thought instead of a straight how to. I used Photoshop to manipulate the image. Journalpage 127 is the image I started with.
This image is meant to be a journal page that can be printed and written on. I wanted to see what changes I could make and add a quote. Here is where it ended up.
I turned the image clockwise using the transform tool.
Rasterized the type and filled it with a pattern I made from the print used in the geometric design.
Type was stroked and embossed.
Using the paint bucket tool, I filled the background with a new color, chosen also from the print in the geometric design.
Once the design was done, the background (which is everything but the type) was textured with one of the patterns in the fill box.
This image will be posted to my kathyannewhite blog on November 28th. Everyday that blog has a new post containing a positive aspect.
Friday, November 27, 2009
Wednesday, November 11, 2009
Photoshop and Printing Ideas
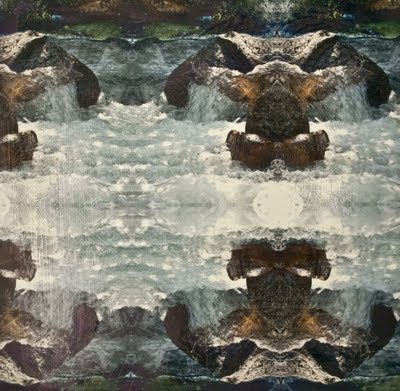
My new "Surfaces" book is in the works and one of the printing ideas from the book comes from an image on the KathyAnne Art site. Tessellation 10 from the Yosemite collection was chosen for a print on watercolor paper. The paper has a pattern created with Golden's Molding Paste. The paste was applied and scraped, with a cut piece of hardware cloth. Once dry, the paper was coated with Type ll precoat from inkAID.
Using Tesselation 10, I changed the image by doing the following. This can be done with both Photoshop and Photoshop Elements.

Using Tesselation 10, I changed the image by doing the following. This can be done with both Photoshop and Photoshop Elements.
After downloading this image from the KathyAnne Art site, I changed the canvas size to twice the height so that I could copy the image, flip it vertically to come up with my final image to print.
So that you could clearly see the papers texture once printed, I was looking for an image that would show that once printed and photographed.

This is the final print.
The detail will show the texture from the paper.
My new "Surfaces" book will include canvas, pimatex cotton, some papers, lutradur, organdy, silk and tyvek. The books focus is about my experiences and ideas when I digitally print these surfaces. Off to the library today to finish the chapter on tyvek and hopefully canvas. The ebook should be available later this month. This will be the first book in a series that will start with books covering the topics of surfaces, texture and easy printing on the road for journaling.
Visit KathyAnne Art for tutorials and workshops.
Visit KathyAnne Art for tutorials and workshops.
Monday, November 9, 2009
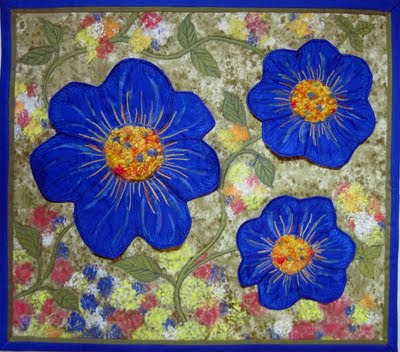
Bonnie Samuel received her BA, Liberal Arts, at Drake University. Her art has developed over many years with study and experience in oil painting, sewing, handweaving and fiber art. Bonnie completed course work, seminars and classes in various art mediums and has had the good fortune to find mentors who inspired and helped in skill building.
Bonnie’s concentration has been studio work and developing a body of work over the past couple of years. Some work has been shown informally, but now the intent is to begin submission to art and art quilt shows. She had two art quilts placed in the "Textile & Fiber Art Exhibition 09" at the Fisher Art Center in Marshalltown, IA.
Bonnie also authors a blog "about fiber in art, culture and life," providing news and resources for the creative world of fiber artisans worldwide.
When asking Bonnie about her work, she told me the following:
"My life experiential path has been diverse, yet of great value in building a foundation for my avocation as a fiber artisan. Each art experience has added to a collage of interrelated segments, that in recent years has brought my art expression into focus for me.
The quilt art format combines creative elements I find most interesting and expressive – fabric, stitch, thread and painting. Design elements, either representational or abstract, are utilized in purposeful images to evoke an emotion, memory or bring focus to the message expressed by the art piece.
Fiber art is a rich, fulfilling and creative medium for me. It is an expressive art form, diverse in methods, construct, visual applications and employs a variety of skills. Fiber art is challenging and enriching for me as an artist and I think, too, for the viewer.
My imagery is meant for the viewer to identify with, have a good laugh, raise a fist in affirmation or simply enjoy."
Coming from an art quilt background, I love the colors and imagery Bonnie uses in her work. Look up her blog at
Bonnie Samuel Designs Blog You can also visit her website
Bonnie Samuel Designs. You will find contact information at
these links if you would like to contact Bonnie.
Below are 2 of Bonnie's Colorful art quilts.
Thursday, November 5, 2009
Journals with Digital Elements

Have you ever considered using digital elements in your journals or art books? In this workshop you will design and construct your own original journal from cover to cover. Exploring the numerable possibilities for using digital prints, patterns and textures in journals, art journals or art books. Experiment with images and create surfaces that can be printed on ink jet printers.
You will:
Dye, paint, and/or overprint the base pages
Work with inkAID digital grounds to coat surfaces for printing
Create transparent or textural skins
Print on fabric using carrier sheets
Design your pages in the journal
Create a cover
Put it all together
Questions are welcome at anytime. This is an online workshop and can be accessed at any time.
The accompanying video has the following segments:
A chat about the workshop
Making a cheesecloth skin
Create painted pages
Overprint painted pages
Melt tyvek and lutradur
Take a look at how journals are created
Covers
A complete look at an art journal from start to finish
To register for this workshop go to KathyAnne Art
If you are a member, be sure to sign in and receive your 20% off the cost of $50.00. Member price $40.00
Any questions, contact Kathyanne


Labels:
digital prints,
digital workshop,
journals,
lutradur,
mixed media,
tyvek
Wednesday, November 4, 2009
Garbage Journal Mini Workshop
This is my planning journal, it is 9.5" in height and 11" wide. This journal took approximately 5 hours from start to finish.
The journal directly below is an everyday journal. It measures 8" in height and 10" wide.
This month's free mini workshop for members at KathyAnne Art is Garbage Journals. Non members can take the monthly workshops for a fee of $9.95. This workshop takes the participant through ideas and creating these types of journals. Registration for the workshop is at the link above. The workshop is ongoing - online. Take it at your leisure.
This is my studio journal-the pages
7" in height and 5" wide.
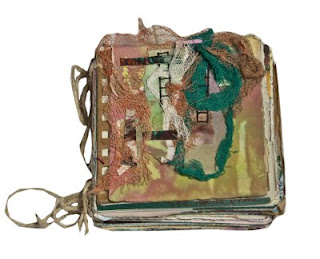
This small journal is 4" x 4" and iseasy to carry with for jotting notes
Garbage journals consist of leftovers, collected papers, maps, fabrics etc.
Most of the time, mine are created for a specific purpose, but they are always
created rough and in a hurry. These journals are fast, spontaneous and fun to make.
The largest of the journals shown was created start to finish in 4 hours. The little 4” x 4” journal was created in 2 hours. All the materials, including the pieces for the cover were in a box or a drawer.
You would be amazed how many items are around your studio or workspace for this type of project. Start to pull elements into a space and see what happens. Tailor your journal to the size of your materials.
Subscribe to:
Posts (Atom)


