Wednesday, December 9, 2009

Art in Common


Art in Common is a private social network available to the members of KathyAnne Art.  Each new member will receive an invitation to Art in Common that will allow them to access the site.

The site contains:

*A forum for members to ask questions and start discussions.

*A blog for any of the members to use or post.

*Tutorials that are easily accessed which currently include:
Enlarging an Image to Print
Amate Process to make Paper from Kozo
Beginning Text using Photoshop Elements Part 1 & 2
Overprinting a Design
Creating Textures in Photoshop Elements
Photoshop Shortcuts
Stripe from an Image in Photoshop
Combining Photoshop Layers
with more to come

*Members can watch the videos posted and post their own.

*Members can post events they are involved in or want to publicize.

* Members can post photos of their work.

*Members can customize their pages.

*Members can chat.


The above images were created from the combining layers tutorial for Photoshop.

Sunday, December 6, 2009

Creating a Background and Frame from an Image

One of the benefits for membership in KathyAnne Art are the free mini workshops that are announced in the enews-letter every month.  This month the workshop is "Creating a Background and Frame from an Image".  Created for both Photoshop and Photoshop Elements, this workshop gives ideas on creating backgrounds and shows how the techniques explained can be used in other ways.

Members, sign in to download the mini workshop for free KathyAnne Art site.
Non members can purchase the workshop for $9.95  


Any questions? Contact Kathyanne


Thursday, December 3, 2009

Carol Wiebe: Artist Profile


Carol Wiebe is my artist profile this month.   I met Carol when she commented about a post on my KathyAnneArt blog.  Since then, Carol has enriched my life in many ways and has become a special friend of mine.

Carol's blog Silverspring Studio should be on everyone's "blog to visit often" list.  Unlike myself, Carol writes consistently, sometimes daily, but
certainly every few days and her content is interesting and varied.  I was inspired to my beverage can installation after a blog post Carol did which included a video "Margaret Wertheim: The beautiful math of coral (and crochet)". This video this video is an inspiring TED talk and describes an incredible crocheted installation project.  After viewing the video, I thought- wow I could do a forest surfaces installation of digitally printed recycled beverage cans.
Needless to say Silverspring Studio is not to be missed.

In Carol's own words:

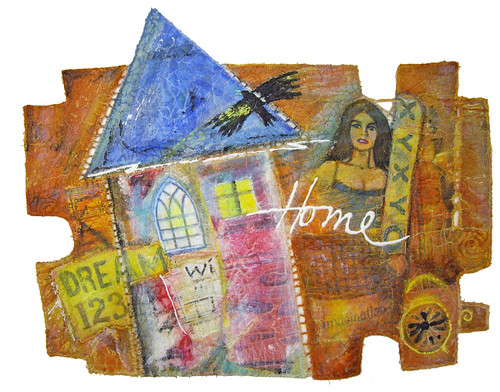
I make art quilts, “Cracked Paper Quilts” to be exact, and I have found that this medium suits me perfectly.  I was already adding paper to my art quilts but after taking a workshop with artist Fran Skiles, I suddenly was able to take the leap into making my total quilt top out of paper.  I became obsessed with all that I could do with this humble material. I am passionate enough to devote every possible moment I can to creating art quilts, as well as preparing the materials I need or studying art books and attending workshops to increase my skills".


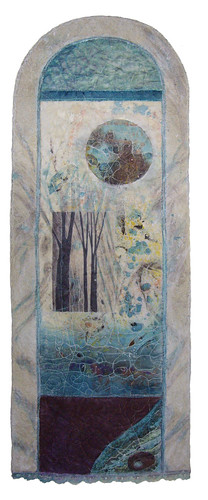
                    Dress       10" x 15.5"                                          Nest      31.5" x 25"


I am inspired by everything around me. I use my camera, pens and brushes to record what draws my eye, mind, and heart.  Then comes the computer stage, which I have to be careful to curtail or it dominates my time. It is just so much fun to turn my gathered images, words, and information into what I call design papers, the “fabric” of my paper art quilts.


A quilt can take anywhere from a week to a month (or a lifetime) to make. I incorporate all kinds of handmade elements, so I may have to carve some stamps, make stencils, create design papers in a myriad of ways. Then there is all the stitching, painting, stamping, collage. I may decide I want some paper beads added, or a clay inclusion or two. These have to be designed and created. I may be inspired to write a poem about what the piece is teaching me. As you can see, this process can become quite involved".


Be sure to visit Carol's blog and also see her videos of her process on Vimeo-

Cracked Paper Quilts 1: Sewing the Paper Top
Cracked Paper Quilts 2: Stitching the Paper Sandwich

Or if you are a KathyAnne Art member, you can enjoy Carol's videos on Art in Common.

Friday, November 27, 2009

Playing with Images

This will give a cursory look at what can be done to one of the images on the Kathyanne Art site.  It's a before and after.  I got involved in changing this image to something else and didn't write the steps down, so in this situation, it will be food for thought instead of a straight how to.  I used Photoshop to manipulate the image.  Journalpage 127 is the image I started with.


This image is meant to be a journal page that can be printed and written on.  I wanted to see what changes I could make and add a quote.  Here is where it ended up.


I turned the image clockwise using the transform tool.
Rasterized the type and filled it with a pattern I made from the print used in the geometric design.
Type was stroked and embossed.
Using the paint bucket tool, I filled the background with a new color, chosen also from the print in the geometric design.
Once the design was done, the background (which is everything but the type) was textured with one of the patterns in the fill box.

This image will be posted to my kathyannewhite blog on November 28th. Everyday that blog has a new post containing a positive aspect.

Wednesday, November 11, 2009

Photoshop and Printing Ideas

My new "Surfaces" book is in the works and one of the printing ideas from the book comes from an image on the KathyAnne Art site.  Tessellation 10 from the Yosemite collection was chosen for a print on watercolor paper.  The paper has a pattern created with Golden's Molding Paste. The paste was applied and  scraped, with a cut piece of hardware cloth. Once dry, the paper was coated with Type ll precoat from inkAID.

Using Tesselation 10, I changed the image by doing the following.  This can be done with both Photoshop and Photoshop Elements.


After downloading this image from the KathyAnne Art site, I changed the canvas size to twice the height so that I could copy the image, flip it vertically to come up with my final image to print.
So that you could clearly see the papers texture once printed, I was looking for an image that would show that once printed and photographed.


This is the final print.


The detail will show the texture from the paper.

My new "Surfaces" book will include canvas, pimatex cotton, some papers, lutradur, organdy, silk and tyvek.  The books focus is about my experiences and ideas when I digitally print these surfaces.  Off to the library today to finish the chapter on tyvek and hopefully canvas.  The ebook should be available later this month.  This will be the first book in a series that will start with books covering the topics of surfaces, texture and easy printing on the road for journaling.

Visit KathyAnne Art for tutorials and workshops.

Monday, November 9, 2009


Once a month I will be featuring a member of KathyAnne Art.  For November I would like to introduce Bonnie Samuel.  


Bonnie Samuel received her BA, Liberal Arts, at Drake University. Her art has developed over many years with study and experience in oil painting, sewing, handweaving and fiber art. Bonnie completed course work, seminars and classes in various art mediums and has had the good fortune to find mentors who inspired and helped in skill building.
Bonnie’s concentration has been studio work and developing a body of work over the past couple of years. Some work has been shown informally, but now the intent is to begin submission to art and art quilt shows. She had two art quilts placed in the "Textile & Fiber Art Exhibition 09" at the Fisher Art Center in Marshalltown, IA.
Bonnie also authors a blog "about fiber in art, culture and life," providing news and resources for the creative world of fiber artisans worldwide.


When asking Bonnie about her work, she told me the following:
"My life experiential path has been diverse, yet of great value in building a foundation for my avocation as a fiber artisan. Each art experience has added to a collage of interrelated segments, that in recent years has brought my art expression into focus for me.


The quilt art format combines creative elements I find most interesting and expressive – fabric, stitch, thread and painting. Design elements, either representational or abstract, are utilized in purposeful images to evoke an emotion, memory or bring focus to the message expressed by the art piece.


Fiber art is a rich, fulfilling and creative medium for me. It is an expressive art form, diverse in methods, construct, visual applications and employs a variety of skills. Fiber art is challenging and enriching for me as an artist and I think, too, for the viewer.


My imagery is meant for the viewer to identify with, have a good laugh, raise a fist in affirmation or simply enjoy."


Coming from an art quilt background, I love the colors and imagery Bonnie uses in her work.  Look up her blog at 
Bonnie Samuel Designs Blog You can also visit her website
Bonnie Samuel Designs.  You will find contact information at
these links if you would like to contact Bonnie.  


Below are 2 of Bonnie's Colorful art quilts.


Thursday, November 5, 2009

Journals with Digital Elements


Have you ever considered using digital elements in your journals or art books?  In this workshop you will design and construct your own original journal from cover to cover.  Exploring the numerable possibilities for using digital prints, patterns and textures in journals, art journals or art books.  Experiment with images and create surfaces that can be printed on ink jet printers.

You will:
Dye, paint, and/or overprint the base pages
Work with inkAID digital grounds to coat surfaces for printing
Create transparent or textural skins
Print on fabric using carrier sheets
Design your pages in the journal
Create a cover
Put it all together


Questions are welcome at anytime.  This is an online workshop and can be accessed at any time.

The accompanying video has the following segments:
A chat about the workshop
Making a cheesecloth skin
Create painted pages
Overprint painted pages
Melt tyvek and lutradur
Take a look at how journals are created
Covers
A complete look at an art journal from start to finish

To register for this workshop go to KathyAnne Art
If you are a member, be sure to sign in and receive your 20% off the cost of $50.00. Member price $40.00

Any questions, contact Kathyanne


Wednesday, November 4, 2009

Garbage Journal Mini Workshop


This is my planning journal, it is 9.5" in height and 11" wide.  This journal took approximately 5 hours from start to finish.

The journal directly below is an everyday journal.  It measures 8" in height and 10" wide.
This month's free mini workshop for members at KathyAnne Art is Garbage Journals.  Non members can take the monthly workshops for a fee of $9.95. This workshop takes the participant through ideas and creating these types of journals.  Registration for the workshop is at the link above.  The workshop is ongoing - online.  Take it at your leisure.
This is my studio journal-the pages
 7" in height and 5" wide.
                                                                                                            This small journal is 4" x 4" and is
                                                                                                            easy to carry with for jotting notes                


Garbage journals consist of leftovers, collected papers, maps, fabrics etc.  
Most of the time, mine are created for a specific purpose, but they are always
created rough and in a hurry.  These journals are fast, spontaneous and fun to make.  

The largest of the journals shown was created start to finish in 4  hours.  The little 4” x 4” journal was created in 2 hours. All the materials, including the pieces for the cover were in a box or a drawer.  

You would be amazed how many items are around your studio or workspace for this type of project.  Start to pull elements into a space and see what happens. Tailor your journal to the size of your materials.

Sunday, October 25, 2009

My Creative Process


This week I have been working on the first book in a series. This book will start with simple surfaces, that anyone can print on an inkjet printer. (the only requirement is the printer has to be a pass thru printer, not one that brings the surface in below and flips it over to print) These surfaces may be as far as any of the readers venture into digital printing and are some of my favorites.

So on the way to writing these books, on the way to my inspiration, procrastination sets in. Sidetracking myself is part of my process. "The book's" content is in the back of my mind and I think of all that I can in order to get inspired to what I want. These images are part of my procrastination. I always feel better when I am creating something, so sometimes I take old hardcover books and paint the pages. This way if I ever want to write something, I have colored pages to write on. White is just not my thing.

Now I am on to using the pages, so I scanned them all in (there are 35 of them) to my computer and now have all these pages that can be used as backgrounds for all sorts of things. The book painted, is a rough page watercolor blank journal. I have tons of these things around for when the spirit moves me:) Next I will make them into files that I can load onto the KathyAnne Art site and members can download them to use them for grounds or whatever else they want to do to them.

These pages have already made there way into my book. They are not identifiable in the book, but used in random ways. Just thought this morning I would post some of them.

Saturday, October 24, 2009

Journal Pages with Digital Prints


Many times I will use images from the KathyAnne Art website and create digital journal pages from them. This one is a scan of a trim added to painted watercolor paper. After the scan is printed on a new page, a digital print on pimatex cotton is stuffed and added to the page with plenty of room to write if desired.

This page is a scan of a roughly painted watercolor paper. Once the painted paper is scanned, an image is added to the layer above the painted scanned layer. The image added here is a part of a cactus that has a blend mode added in Photoshop to blend the images.

Here we have a cactus pattern overlayed on a painted ground on watercolor paper. The one below is much the same way with the layers blended by overlay. The piece on the bottom is a digital print of a scanned background.

In my newsletter for the month of November, I will include information on a tutorial on how to create these journal pages. The mini workshops each month are free to members and there is a charge for the pdf to non members. Sign up for my email list on KathyAnne Art