Saturday, January 15, 2011

Mixed Surfaces Journal: Part 1 Mini Workshop

This is a 3 part workshop about creating journals with mixed surfaces.  The workshop is presented by a video and a pdf.

In this first part we will color our papers and fabrics along with pulling together other scraps and elements to be added to the mix of journal surfaces.

In the second part we will take a look at ways to digitally print surfaces and design images to work with our painted surfaces.  Looking at digital prints in a way that they will successfully accent your journal construction.  With an infinite array of choices, you pick and choose what will work for your composition.  During this part of the workshop we will add digital prints to journal pages 

In the third part we will completely assemble our journal.  By this time in the workshop all the pieces will come together as you work out your intention for your unique creation.  


This workshop is free to KathyAnne Art members and can be accessed here.  Members be sure to log in first.

Non members Part 1 of the Mixed Surfaces Journal workshop is $9.95.


Wednesday, December 8, 2010

Creating Texture with Lutradur Video Workshop


Lutradur is an interesting surface to digitally print and manipulate.  It is one of the surfaces I use consistently in my artwork.  This intriguing surface is wonderful to heat distress and is the essence of creating texture.  When I plan to use lutradur, I consider my layers and decide what other surfaces would work well with this substrate for the particular project.   Next my surfaces are printed.  Using my completed prints, I burn, tear, stitch and bead the lutradur to build my textures. 
In this mini video workshop I will: melt and alter printed lutradur in 2 thicknesses, explain my process of layering and beading, show the layers that go into 2 pieces, align and explain how to proceed on a work in progress, demonstrate small adjustments to a finished piece. 
You will receive the URL and password to access the video when you sign up and download your PDF action guide.  This PDF will have my source for lutradur along with  detail pictures of the artwork from the video.
If you have any questions about the workshop or information, feel free to email me.
KathyAnne Art members be sure to log in on the site for this monthly free to members workshop.  Non members can use the Buy Now button below to purchase the workshop for $9.95.


Wednesday, October 27, 2010

Creating Texture in Photoshop Elements 9

This mini workshop will give you a start at creating textures in Photoshop Elements.  When I texture in Elements or Photoshop I use the same basic process of making selections. Things are a little different for  Photoshop, but if you are interested in creating texture, I know you can use the information in this video with Photoshop.  You will sometimes find the tools or features in Photoshop in different places then in Photoshop Elements, but they are there.

Using this new software to create a video, is new to me, but I feel it is an effective way to show various tasks in my photo programs.  It’s so much better for the viewer to watch me work on the screen.  As I get used to this video format, I will be switching off from Photoshop Elements 9 to Photoshop CS5.   This will enable me to share more information on my digital process. I will be working on some basic Photoshop Elements tutorials in the coming months.

In this workshop we will make selections., create layers from selections,  fill selections, create new layers, copy layers, texture selections with filters and blend modes.  This is not a beginning Photoshop Elements workshop, it is a process for a way to build texture that is constructed with Elements.  If you are a beginner and you spend the time to do exactly what I do, you should be able to find your way around the information.  You are always welcome to contact me with questions.  


This mini workshop is free to KathyAnneArt members be sure to log in on the site.
Non-members go to the KathyAnne Art site to sign up for the workshop for $9.95.

Friday, October 22, 2010

KathyAnne Art Members Downloading Images and Workshops

Members can easily download images, tutorials and monthly workshops that are free to members.  Screen shots depict this in the following post.  Once in awhile a member would like to see what this looks like.  To make the screen shots larger, click on them and they will open in another window for you to see them clearly.

First sign into the site.


Monday, September 27, 2010

Finish Your Journal-Assembling Pages


Seems I am always making journals.  Whether it is for a workshop or just because I get the urge, there are journals and journal pieces all over my studio.  
Once the covers and pages are complete, they need to be assembled.


This mini video workshop covers attaching your pages when 
you have finished all the elements to your journal.

Most of my journals are collaged before pages are attached.  In the demo journal for the video the pages are freshly cut and white.  After I finished the video, I went back with dyes mixed with water and brushed dye over the pages.  You can see that in the section pictured with the title at the top of this post.  


  My preference is to work intuitively and let the
materials and pieces determine how they all end up.
My journal construction follows this course.   In the video, I show you a few journals that have been assembled, what they look like when finished and different beaded backs.  The journal below is the one I assemble for the workshop.


This workshop is free to members, so if you are a member be sure to sign in before adding the workshop to your cart.

Non-members go to KathyAnne Art to purchase the workshop for $9.95.


Tuesday, August 24, 2010

Printer Profiles: Photoshop Elements 8

Since Photoshop Elements 8 was released, I have received emails asking me how to get decent prints when printing from this edition of Elements.  It takes a little finding the right places since it is,t a little different then the last few versions.  Here is a quick look at the printer boxes in Elements 8 that will get you what you want for printer profiles.

Personally I think it is a little confusing, but we will take several options and you will get the idea how this works.  There are other choices along the way, but for now try this.

Once I use File
My usual path would be to pick Page Setup (you see the red circle bottom left) to choose my paper size and orientation.
If the print is 8.5 x 11 this is the easy way to get to it. I could then click ok and go on.  
The only problem is then you do not ever see one of the color settings.  When I advise my students I tell them to go to More Options and skip this box all together.

So instead lets choose More Options next to Page Setup in the bottom of the box.
More Options box is now open


Choose Color Management and then under color handling change the pull down menu to say Photoshop Elements Manages Color.  This is  your first step to controling the color by taking away from the printer and letting Elements to do it.  Don't let your printer manage your color.
Next choose custom print size and choose the correct print size for your print.
Pick the size you want or make a custom size if the size is not in your list.  
Click OK 
In this box click Print - bottom right and you are on the last couple of steps.
In this box in the Layout pull down menu choose Print Settings
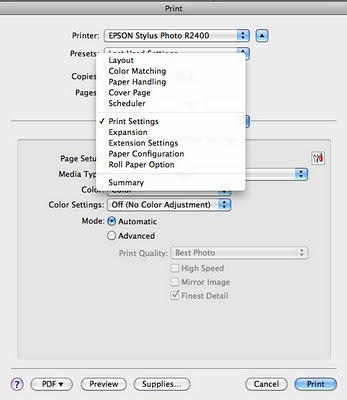
Go to Media Type pull down menu and pick your paper type
Under Color Settings choose Off (no Color Adjustment) again you do not want the printer to adjust your color.
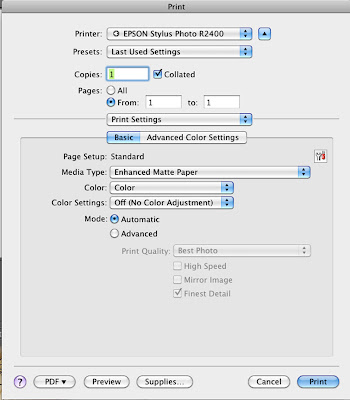
If you are printing with thick paper go to Print Settings and in that pull down menu
choose Extension Settings
Now you can finally click Print

Yes there are other choices to make along the way.  My examples show my most used choices.
Then the next time I print, if I want to print with the same papers etc.  I use the last used settings choice in the print box and it does all the same choices for me.  That setting is a great addition in one of the last versions of Photoshop and Elements.
Always make sure you change you color settings in the 2 places shown. 

Monday, August 23, 2010

Working with Hardware Cloth

August's Mini Workshop, free to KathyAnne Art members, is "Working with Hardware Cloth".
The workshop is posted to the KathyAnne Art site under collections

This is a video workshop. which means that once members sign in and get the workshop, they can then download the pdf file which includes the information on viewing the video.  The pdf also contains supplier information.  

An explanation of the workshop is below.  

Non-members can take the workshop on-line for a fee of $15.  Just follow this link.  Once you pay for the workshop, you may return to KathyAnne Art site with your order # and sign in as a non member to retrieve your download of the pdf file.