Tuesday, August 24, 2010

Printer Profiles: Photoshop Elements 8

Since Photoshop Elements 8 was released, I have received emails asking me how to get decent prints when printing from this edition of Elements.  It takes a little finding the right places since it is,t a little different then the last few versions.  Here is a quick look at the printer boxes in Elements 8 that will get you what you want for printer profiles.

Personally I think it is a little confusing, but we will take several options and you will get the idea how this works.  There are other choices along the way, but for now try this.

Once I use File
My usual path would be to pick Page Setup (you see the red circle bottom left) to choose my paper size and orientation.
If the print is 8.5 x 11 this is the easy way to get to it. I could then click ok and go on.  
The only problem is then you do not ever see one of the color settings.  When I advise my students I tell them to go to More Options and skip this box all together.

So instead lets choose More Options next to Page Setup in the bottom of the box.
More Options box is now open


Choose Color Management and then under color handling change the pull down menu to say Photoshop Elements Manages Color.  This is  your first step to controling the color by taking away from the printer and letting Elements to do it.  Don't let your printer manage your color.
Next choose custom print size and choose the correct print size for your print.
Pick the size you want or make a custom size if the size is not in your list.  
Click OK 
In this box click Print - bottom right and you are on the last couple of steps.
In this box in the Layout pull down menu choose Print Settings
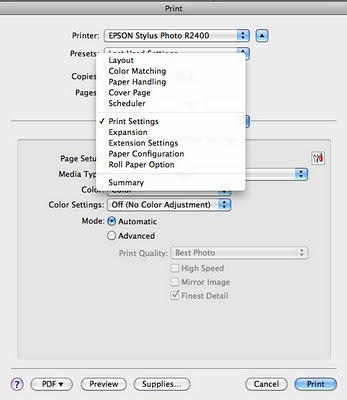
Go to Media Type pull down menu and pick your paper type
Under Color Settings choose Off (no Color Adjustment) again you do not want the printer to adjust your color.
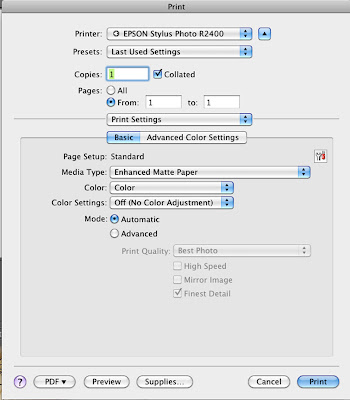
If you are printing with thick paper go to Print Settings and in that pull down menu
choose Extension Settings
Now you can finally click Print

Yes there are other choices to make along the way.  My examples show my most used choices.
Then the next time I print, if I want to print with the same papers etc.  I use the last used settings choice in the print box and it does all the same choices for me.  That setting is a great addition in one of the last versions of Photoshop and Elements.
Always make sure you change you color settings in the 2 places shown. 

Monday, August 23, 2010

Working with Hardware Cloth

August's Mini Workshop, free to KathyAnne Art members, is "Working with Hardware Cloth".
The workshop is posted to the KathyAnne Art site under collections

This is a video workshop. which means that once members sign in and get the workshop, they can then download the pdf file which includes the information on viewing the video.  The pdf also contains supplier information.  

An explanation of the workshop is below.  

Non-members can take the workshop on-line for a fee of $15.  Just follow this link.  Once you pay for the workshop, you may return to KathyAnne Art site with your order # and sign in as a non member to retrieve your download of the pdf file.

Monday, July 19, 2010

Easy Pocket Journals Mini Workshop

Although I have zillions of journals, imagining new ideas for creating journals, is one of my favorite things to do.  So many times, my journals get heavy and are not convenient to carry around.  Then add pens to the mix and the whole transportation thing becomes cumbersome.  So my thoughts have been about constructing journals that are smaller and more portable.  In this workshop we will explore two of those types of journals.

Both the journals covered here are light weight and portable.  One is constructed from watercolor paper that is digitally printed on each side and the other is made from recycled pocket book pages.  This is short and sweet, ending small interesting journals.

This workshop is free to KathyAnne Art members. Be sure to sign in.

Non members go to KathyAnne Art Tutorials under Collections.  The workshop is $9.95.
Once you pay for the workshop, you will be able to download the PDF instructions.

Monday, June 28, 2010

Digital Collage Workshop Part 2

Digital Collage Workshop Part 2

In this mini workshop, we will use some of the techniques from  part one of “Digital Collage Workshop”.  In Part 2 as we take a cursory look at 3 different types of digital collage, you will be able to apply what you have already learned and learn other ways of putting those techniques together.  Transfer the ideas in this part of Digital Collage Workshop to your own images and expand on the ideas presented.

As usual, this workshop is a process workshop.  Get familiar with the process and tweak it to fit what you want. Learning how to use Photoshop or Photoshop Elements is entirely personal.  Everyone is looking for something diferent from their images and using these tools is no exception.  Once you work a photo type software long enough, you will find your favorite ways to manipulate images. Your favorite techniques will, by accident at times, take you to other ways to express your  new way of thinking.

One thing is for sure, the more you work, the better you get.  Take the time to develop your images and your style.  It’s amazing what can happen when you continue to expand what you know.

This can be an enjoyable ride.  Don’t take what you do too seriously.  Remember the undo command is just a fingertip away.

This workshop is one of my "Free to Members Monthly Workshops"  All mini workshops on KathyAnneArt are free to members.


Non Members, the workshop is $15.00


Wednesday, June 23, 2010

Digital Print on Alternative Surfaces: Skins and Metal Mesh

My new workshop is online the subject, Skins and Metal Mesh, how to create and how to digitally print.  Here is an intro video from you tube.

Wednesday, May 26, 2010

New Mini Workshop on Digital Collage

Each month KathyAnne Art members can download a free mini workshop.  This month's "Digital Collage Mini Workshop" gives instructions for both Photoshop CS4 and Photoshop Elements 8.

This workshop depicts simple ideas on combining images, without much work but creates wonderful results.  It's easy to use these ideas on your own images.  Most of the images used in the workshop,  are  available for download on the site.  The url for those pages are in the workshop information.

Discover what works for you and develop unique compositions with your photographs and images. 
The more you play with photo software, the better you get.  This will be the first of 2 mini workshops on Photoshop and Photoshop Elements.  Next months we will go into more ideas on how to combine and collage images.


Members the workshop is free, just sign in.

Non members, the workshop is $15.00


Tuesday, May 25, 2010

Using Images to Create Patterns

Here’s a cursory demo “Using Images to Create Patterns” that is the same for both Photoshop CS4 and Photoshop Elements 8.  

I will briefly explain this process with an image from the KathyAnne Art site - The image title is Journalpage_leaves and it is on page 9 of the Journaling Section.  These instructions are the same for both Photoshop and Elements.  The only difference is the menus are slightly different in both programs.  Since it is great to learn something and remember it, I am only going to tell you what to do and let you find out where it all is.   


Open your image.

Then make a selection using the marquee tool  (set the tool on fixed size with a height and width of your choosing.  I use 4” x 4” on this sample)

Open a new file (command n  mac) (control n pc)
the same ppi as your original image and twice the width and height as the original selection.  (My new file is 8” x 8” with 240ppi)

Copy and paste the selection to the new image file.
Now make another copy by either (command j mac) or (control j pc)  
Move both the selections to the top of the box to where the edges meet.  
With one of the layers selected, flip the section horizontally.
Next merge the 2 layers till they are one and copy that layer by (command j mac)
or (control j pc)  and move that layer to the bottom.  


Flip the bottom or top layer vertically and merge them again.


Define pattern under edit
Test your pattern by opening another new file.  Open it larger then your pattern.  I opened a file that was 12” x 12”.  Then fill your new file with the pattern from the pattern palette.  
That’s it, simple.  You made a pattern:)